| HOME | Software | Lotus Cars | DWARF | Kindle | Solar |
Updated 16 December 2012 with the Engine Substitute device
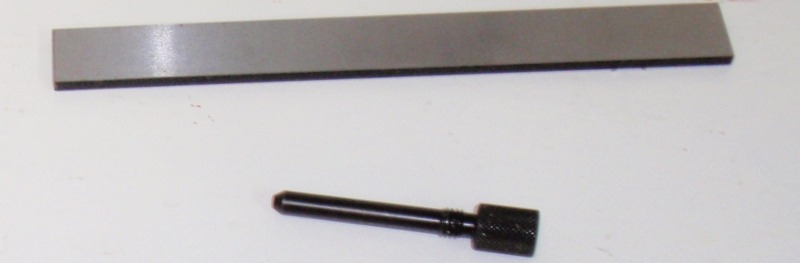
This is simply a degree wheel (easy to keep stationary) and a short 1/2 inch drive extension. This makes it very easy to follow the Ford advice to "then turn 60 degrees" in the engine assembly instructions.
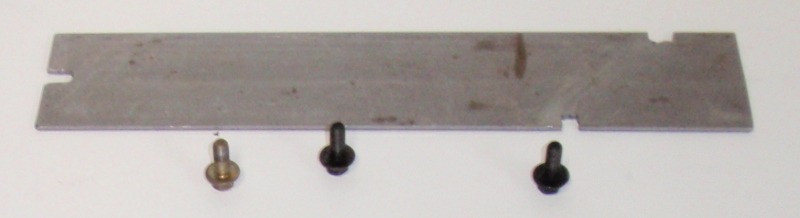
Doesn't look like a tool does it? This simple flat plate screws to the head over cylinders one and two. It provides a stable base for a magnetic-base for a dial indicator. The dial indicator needs a very thin feeler as the cams come very close to the head. Unlike the Lotus TwinCam there is not much room for the feeler to reach the tappet to analyze cam timing...
This is a stock Zetec tool set. For example, Snap-On tools parts 303-574 and 303-465. The knurled rod screws into the block (lower left facing block from the rear) in (temporary) place of a short dummy screw. If you screw it in when near TDC (looking at piston top through spark plug hole) then when the crank stops you will be exactly at TDC. Well, very very close. See below for a tool to help check correctness. With the crank at TDC turn the cams so the rear slots line up and insert the bar (the bar will just clear the head). Even with aftermarket/reground cams the positioning will be very close to right so these tools really help.
If you want to find TDC to verify the official tool 'gets it right' you need to use something to help you. This is a bit of steel welded to the remains of a spark plug. The rod fits inside and the step on the rod means the rod won't fall too much past the spark plug. It won't fall into the cylinder more than you need to find TDC. You stick a dial indicator in the small alloy piece at left, it has a central hole to fit the dial indicator. The screws hold things together. The obvious general plan: read the crank position off a degree wheel at some dial-indicator-measured distance from TDC on both sides of TDC. Half way between those wheel positions is TDC.

To get the crank sensor depth right so it can work with your ECU (precision placement is required) you need to measure the distance from the mount point to the flywheel fingers. The following picture shows a bit of 1/2 inch diameter aluminum rod (scrap rod) with a two-piece clamp-on shaft collar. With the collar loose, slip the rod into the sensor holder till it touches a finger. Tighten the collar while holding the collar against the sensor holder. Now remove the tool and accurately measure the needed depth. I had to lightly file a few thousandths off the plastic self of a sensor to get it into the specified gap (sensor to flywheel finger) range.

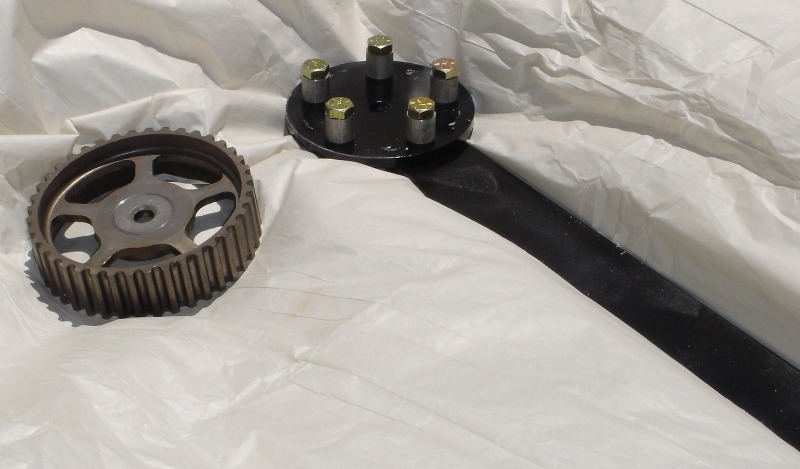
Zetec cam wheels (stock ones, as pictured here) have no positive lock with the cam. Friction holds it together. So to tighten or loosen the fixing bolt one needs a holder. I built this simple tool to do the job, and it does so nicely. I actually use Kent Cams adjustable cam wheels which have a positive locator on the Kent Cams, but the tool works fine on them too. A good reason to use such a tool is it keeps the Torx T-55 drive bit straight while loosening or tightening. Failing to keep the bit straight results in damage to the special pulley attachment bolt and the bit (you are wondering how I know?).
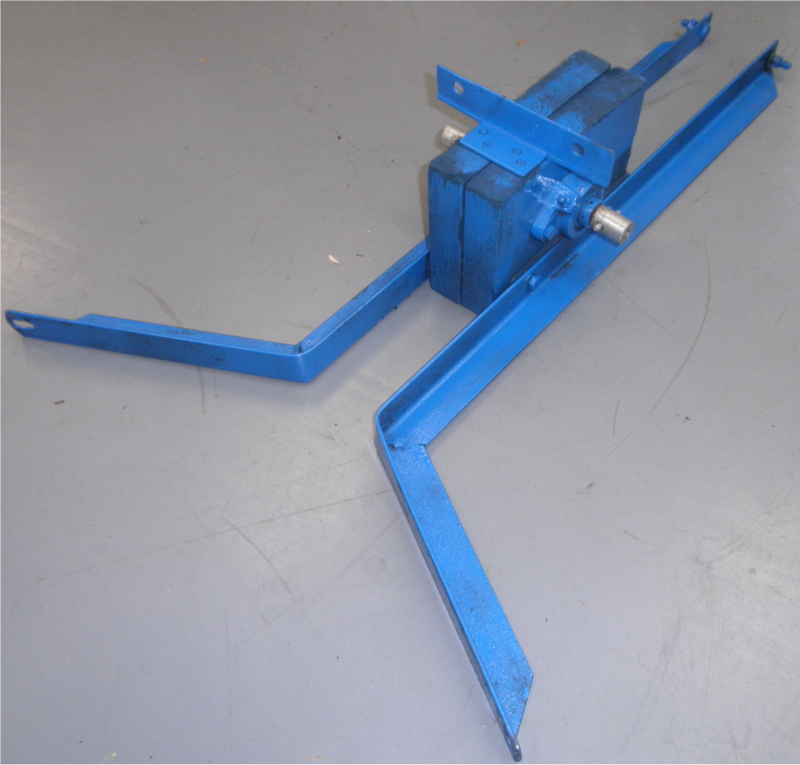
Sometimes one wants the car rollable with no engine and transmission in place. Difficult because the rear suspension mounts to the transmission. The following gives the idea of a workable substitute for early cars, the ones using the 336 transaxle. The rear frame mount for later cars is slightly different. The mount is pictured upsidedown so the suspension attachment points are all clearly visible. Naturally, the little rods at the outer ends of the bearings go thru the yoke holes (loosely).
The major fault with this tool while I used it was I used bearings that tolerate misalignment with no straight-piece throught middle and the result is they do not stay pointing straight out of the wood block. Things got regrettably floppy. So before I put it away (after I was done with it) I installed a solid steel rod through the center of the aluminum end-pieces. The rod is a decent fit, but not tight. The rod is captured by the little rods that go through the yoke holes. The left and right axles can thus turn differently so it is like having a differential -- turning the car while-pushing-it is not difficult. And yet it is not floppy.
I eventually gave it away to a local GGLC member who had a Europa project.
There are a couple other ideas on how to deal with this. Need to document them (writing this August 2015).
Using aluminum to poke into the axle joint is good as no damage to the axle pieces itself is possible.
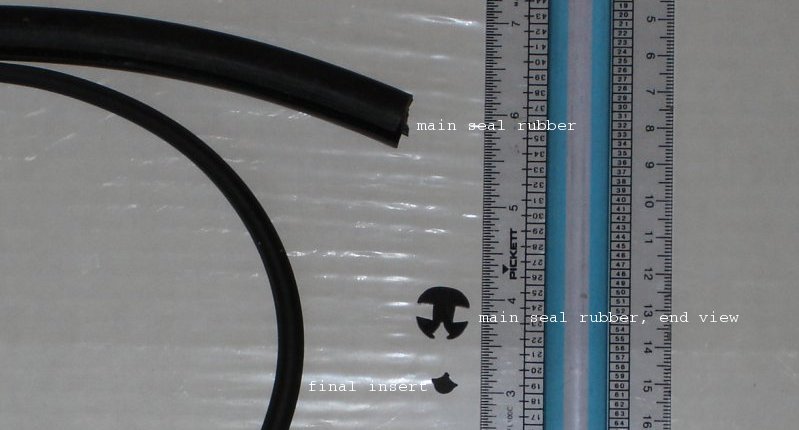
The europa rear window uses a sealing/install that is quite
like the Elan windshield: a long piece of shaped rubber
that grips the glass on one side, the fiberglass on the other, and
a final strip of thin material that helps keep it all together.
The rubber bits look like this.
 It's also complicated on the Europa by the need to have the interior
upholstery and the strip providing an air gap for the air exhaust
over the rear windows both trapped *under* the rubber.
The install of the initial larger rubber is not too hard, but
you really need two people to do it, as the window is long and
nothing stays in place by itself till it's all done...
The final small (triangular) strip then must be inserted into
the larger rubber to trap things. For this a
windshield installation tool
from
www.frost.co.uk
(product code S135) comes in very handy indeed.
It's also complicated on the Europa by the need to have the interior
upholstery and the strip providing an air gap for the air exhaust
over the rear windows both trapped *under* the rubber.
The install of the initial larger rubber is not too hard, but
you really need two people to do it, as the window is long and
nothing stays in place by itself till it's all done...
The final small (triangular) strip then must be inserted into
the larger rubber to trap things. For this a
windshield installation tool
from
www.frost.co.uk
(product code S135) comes in very handy indeed.
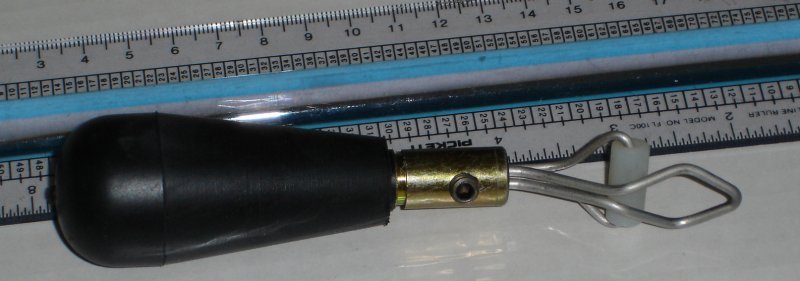 The trick here is to realize that the entire diamond shaped
wire bit goes into (spreads) the tiny slot. So even though the
tiny rubber (which must have its 'pointy end' pointing into the larger
rubber) comes in after the diamond passes, it was spread so wide
that the small rubber fits. I'll bet that makes no sense to you.
It does take some force and some soapy water, but it goes very fast.
Because one cannot reach the tool into the tight corners very well
(unlike the Elan windshield) due to the body interfering, a small tool
like a screwdriver may be used to tuck in any final edges of the
tiny rubber strip. I spent hours by myself on the small strip to no avail
before I had the tool (maybe got 25 percent done, and
was getting no further). With a second person
and the tool it was all done in an hour.
The trick here is to realize that the entire diamond shaped
wire bit goes into (spreads) the tiny slot. So even though the
tiny rubber (which must have its 'pointy end' pointing into the larger
rubber) comes in after the diamond passes, it was spread so wide
that the small rubber fits. I'll bet that makes no sense to you.
It does take some force and some soapy water, but it goes very fast.
Because one cannot reach the tool into the tight corners very well
(unlike the Elan windshield) due to the body interfering, a small tool
like a screwdriver may be used to tuck in any final edges of the
tiny rubber strip. I spent hours by myself on the small strip to no avail
before I had the tool (maybe got 25 percent done, and
was getting no further). With a second person
and the tool it was all done in an hour.
I'm using stainless-steel door hinge material which remains nice and shiny over time but is a bit heavy. Perhaps I will replace the 19 inches of solid stainless rod with an aluminum rod or tube.
The first problem is figuring out how much of a spacer one needs at the hinge bottom, aligning the door vertically. I found that 0.028 inches works on the right hand door but is about the maximum thickness and I may change to 0.023 inches. I notice that with the door aligned in its space the spacer-washers bear on one edge only. That is, the door bottom surface an the body surface are not parallel. Oh well.
The next problem is aligning the doors. I'm not describing how to do that, just mentioning tools here. A simple screw jack under the door (with wood plate to spread the load) is better than hydraulic jack to hold the door up once it is in place and the pin is through the door and both bobbins.. The screw becomes a precision instrument. A hydraulic jack is not a precision instrument in this application!
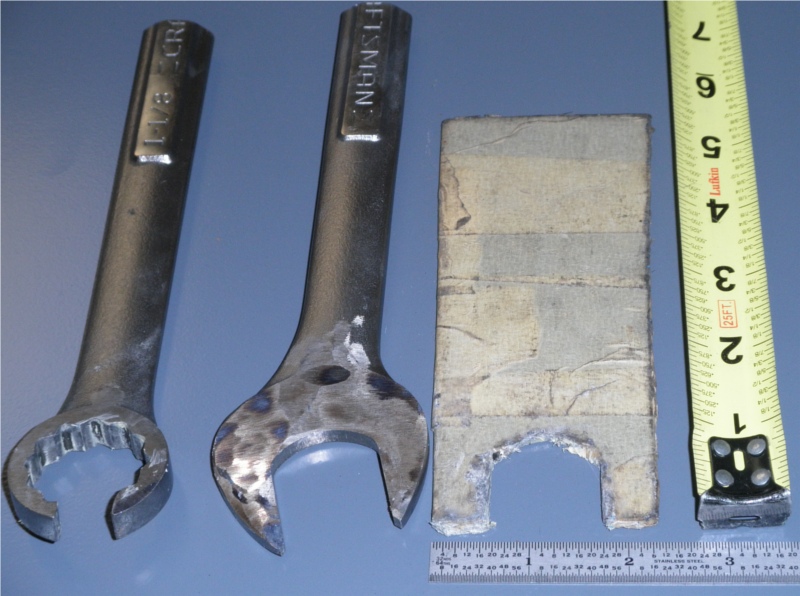
The 'final' problem is tightening the nut (and locknut) that hold the alignment. The rectangular tools is steel, 0.125 inches thick. The hex nuts are 1.125 inches wide, so that is what I cut out of the rectangle. I also ground down the open end wrench, but found it to be less than the best for the top of the door, though usable for the bottom of the door. The box-end wrench is the tool of choice inside the door on the inside nuts. I ground it down a bit to remove a bit of wasted space and so we get full engagement on a nut with no overlap on the locknut (and vice versa). And cut out the slot, obviously.
There are 4 rivets helping hold the window frames to the door fiberglass. Under the rubber/fabric in the channel. A standard pop-rivet gun can't reach into the channel to properly rivet the frames back in. So I made the following little adapter from a bit of steel rod I had laying about. The threads I simply cut with a standard die (I did not thread on the lathe, just cut the basic shape there). Having cut the thru hole and threads and machined the long neck I simply cut it off the steel rod and was done. Almost.
The ruler alongside the part for comparison is measured in inches. It replaces the standard extension and is thin enough to reach into the channel easily. After making it I realized I needed a little nub so that on opening the pop rivet gun the rivet nail would free up. So as an afterthought I brazed (welded) on a bit of brass alloy under the threads.
The wheels were difficult to center using the factory wheel nuts. So I made tools pictured here. I use these two to get the wheels located then snug up the wheel using two factory nuts then remove the tools and do the other two wheel nuts. Of course now I'm using Panasports with conical steel nuts and conical steel seats on the wheel, so these wheel center tools are no longer of too much use.
It was not too much help with the Brand Lotus wheels. The Compomotive wheels seem to be better made though. There is still radial runout at the rear due to the marginal factory hub-spline design. No, there is no 'taper' in the wheel holes, but a hand snugging of the tools requires no taper.
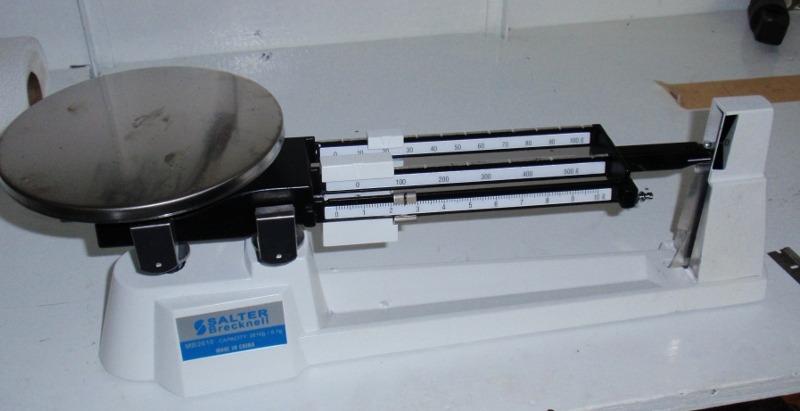
This simple scale is really handy for tasks line ensuring a few parts weigh the same.
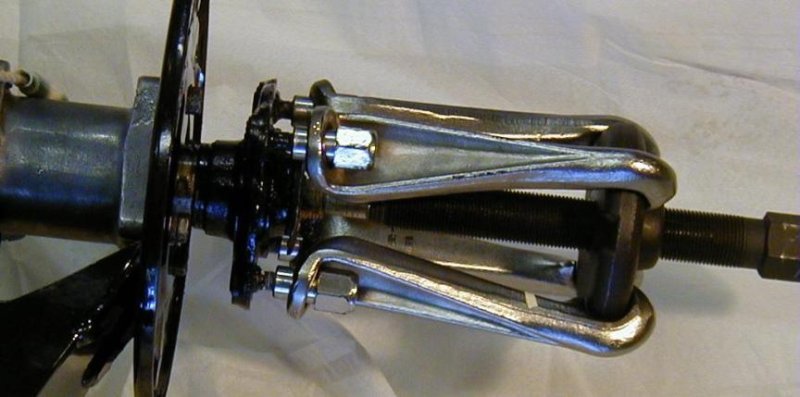
Another handy tool (purchased, not made by me) is a hubpuller. Here's one set up to be used. I think I got it from Harbor Freight.
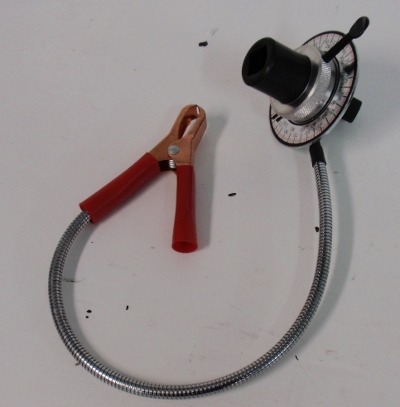
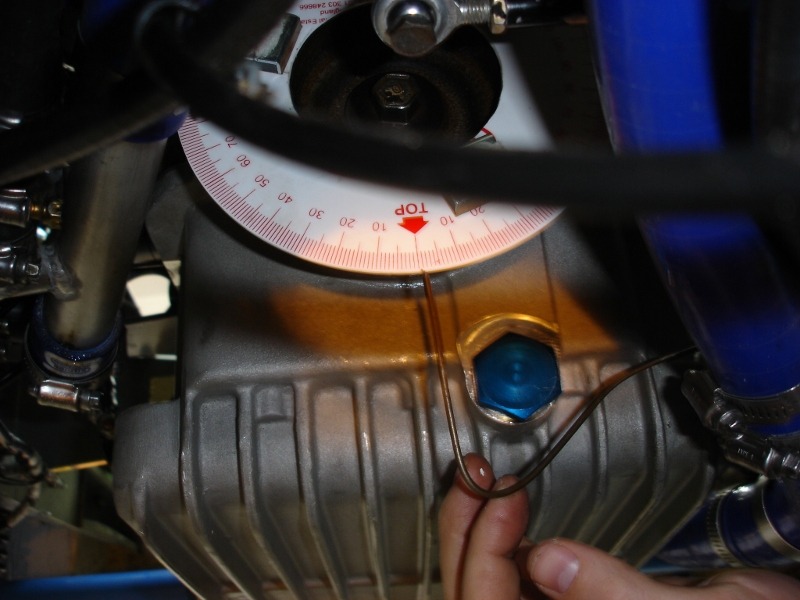
Naturally one has to have a degree wheel to time the cams. Once the engine was in the car I wanted to retime the cams (to check something) and had to figure out how. The first picture is a standard plastic degree wheel that came with the Kent Cams but with the center cut out and magnets sitting on it. You will notice from the picture that it's not actually well made, the plastic and the degree circle don't quite match up! Update December 2016: I now have a lightweight front pully from Dunnell Engines so this degree wheel is unusable. Check out the latest front pulley.
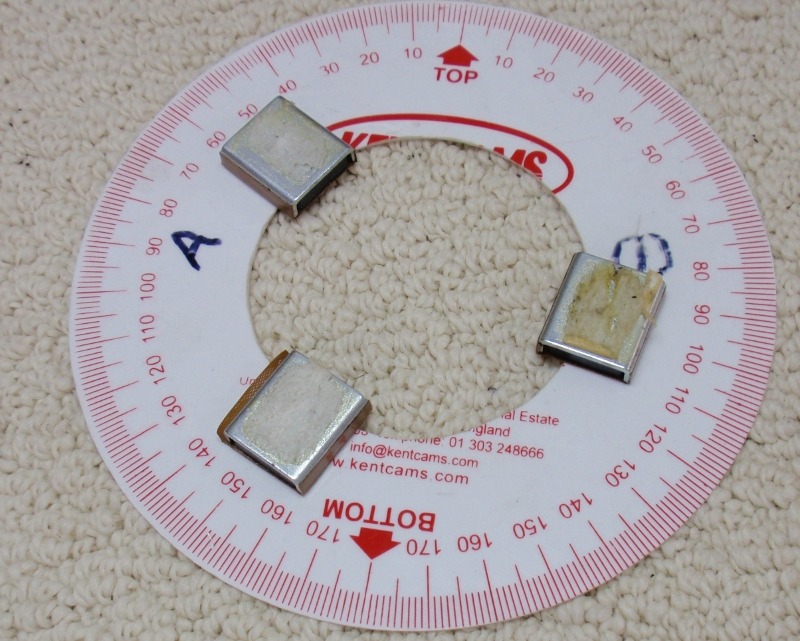
The second picture shows the point of the cutout. It matches the inside diameter of the Zetec harmonic balancer/front pulley and the magnets hold it quite firmly to the balancer. There is plenty of room for a socket on the crankshaft nut. Three refrigerator magnets were sacrificed in this creation of the tool :-) The fuzzy black line through the picture is the alternator belt obstructing the picture. Of course once you replace the heavy stock balancer/serpentine drive with a lightweight alloy serpentine drive one cannot attach the wheel with magnets!
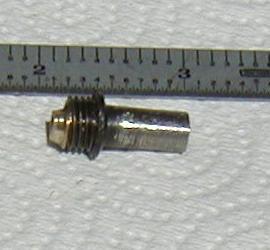
The big nuts on each side of the Renault transmission (whether 336 or NG3 or any of the other variants commonly used in Europas) are sometimes a little hard to get out due to the presence of sealant on the threads (hopefully not too much of it...). If you get all the gunk fully cleaned off the nuts and the case you will find that the big nut threads fit very well indeed, though without sealant on the outer threads you may find they slowly seep transmission oil). A picture of the big nuts and seals (and seal tools) is on the 2016 ng3 update page
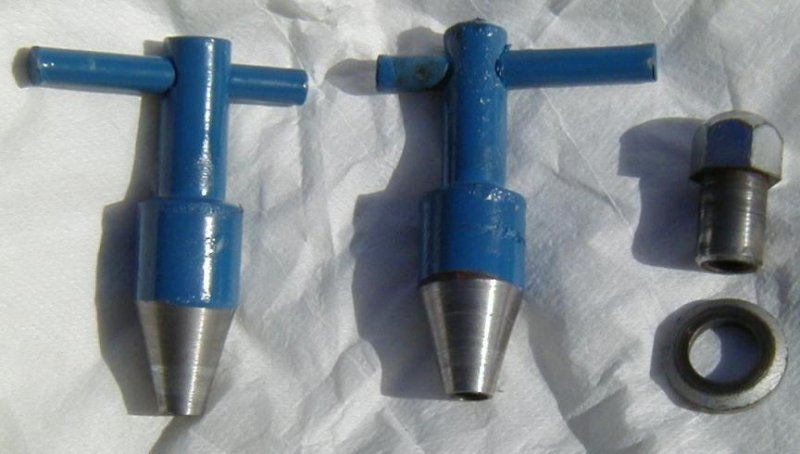
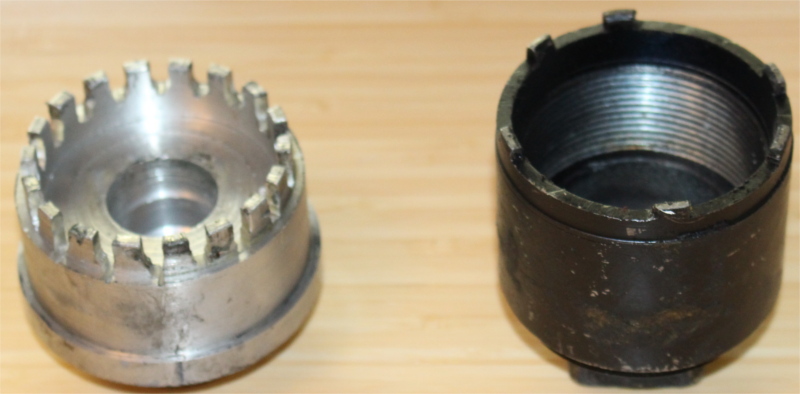
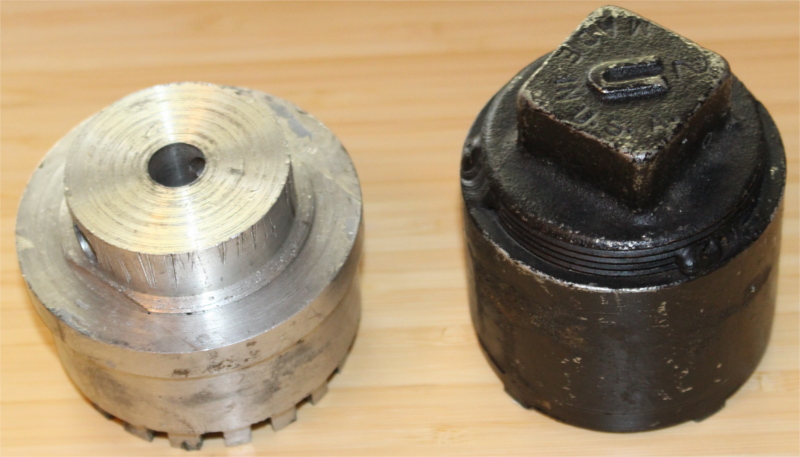
Here are the tools I've used to remove/install the nuts. The aluminum one I made myself and it is the one I prefer to use. It has deep fingers because the original 336 had lots of partially broken little fins due to a DPO.
The steel one came with a spare 336 I bought many years ago from Ted James, a well known west coast race car crew chief for his wife Nancy James (they raced a Europa and later a wide range of cars in SCCA, mainly D Sports Racing class).

This work is licensed under a
Creative Commons Attribution 4.0 International License.