| HOME | Software | Lotus Cars | DWARF | Kindle | Solar |
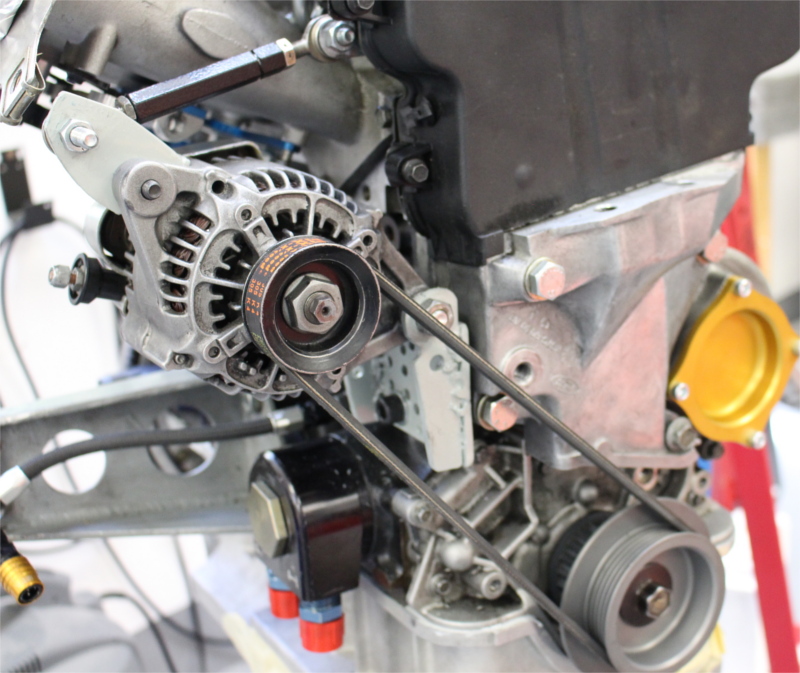
We start with a slightly fuzzy (sorry) picture of the engine as built, looking to the front of the engine. Some major pieces are visible here. At the left are the TWM 2000 intakes and the little Toyota alternator. At the right are the exhaust stubs, and the alternator drive belt idler wheel. And in center are the Kent Cams cam wheels and looking down from there the wheel on the water pump is missing (the 3 bolts hold the wheel on).
All the engine replacement parts would have simpler if I knew the exact (or even any exact) designation of the donor Ford car and the exact Zetec 2.0L designation. Because the factory parts books work best that way. But I don't really know either the car or the engine designation. It helps that I found a very nice parts manager at Veracom Ford in Burlingame, California. Roman Bystron, the manager, had time to look things up and order what I asked for. He seemed quite interested in the project. I always ordered full bags of whatever it was, so he never had to stock leftovers. Which I suppose helped the relationship. I tried a larger and older dealership the week before I found Roman and the place was a dirty zoo and the parts folks did not want me around! So Roman got a couple thousand dollars of business and the larger dealer did not! I drove the Europa down to show the finished car to him as soon as it was reasonably possible.
The engine water pump internals are now gone, replaced by that nice aluminum panel. As of 2015 the alternator drive is simplified to just a small crankshaft pully and an adjustable upper link with a short belt.
HISTORICAL PHOTO. The exhaust is by Boyd Ferry, proprietor of Performance Mufflers in South San Francisco. The exhaust coating was done right next door to him at Sanderson Headers.
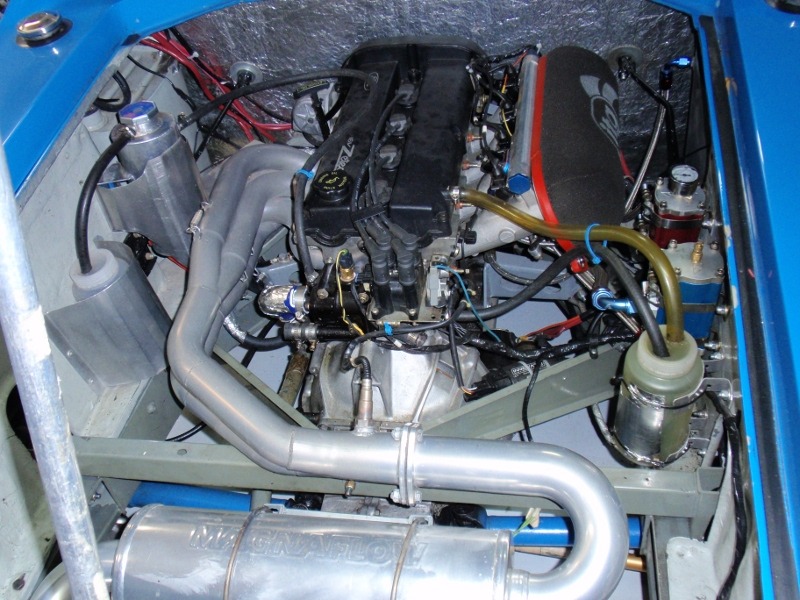
Looking at the HISTORICAL PHOTO above:
The bits on the left of the engine needed thin shields to prevent
melting/overheating due to proximity
to the exhaust.
Both the coolant water and the battery components.
On the right, the red container is the Canton fuel filter.
Everyone says a permanently mounted
fuel pressure gauge won't continue
to work very long, but
mounting this one on the body has so far protected it.
The blue container is the Canton engine oil filter.
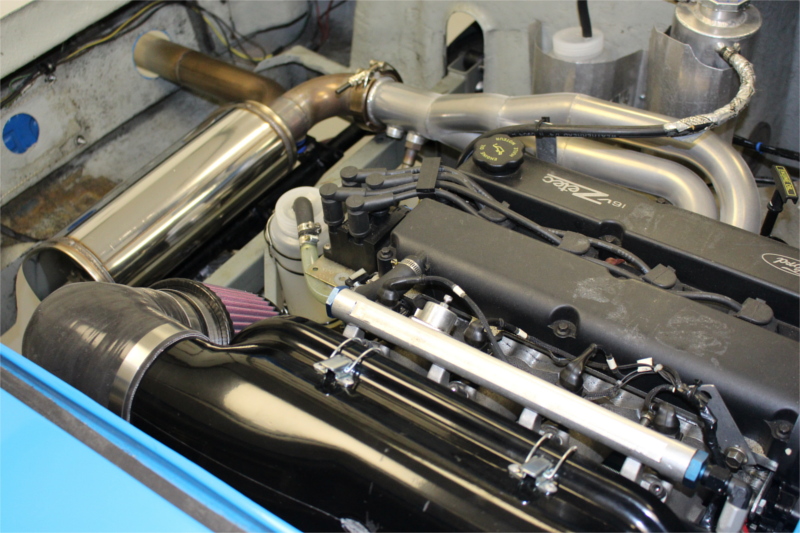
The Innovate LC-1 wide-band lambda sensor is, as of 2018, in the exhaust header. Actually there are two exhaust bungs so when on a dyno there is a place to put the tuner's sensor.
As of 2018 the intake/exaust are updated. This reduced exhaust noise 9DB and reduces intake noise at wide open throttle too. The intake and exhaust were designed and fabricated by Hoover Chan (TurboHoses R & D) and Rob Dietsch (DietschMotorSports). The current exhaust header is the fine work of John Zender.
Now, something about oil:
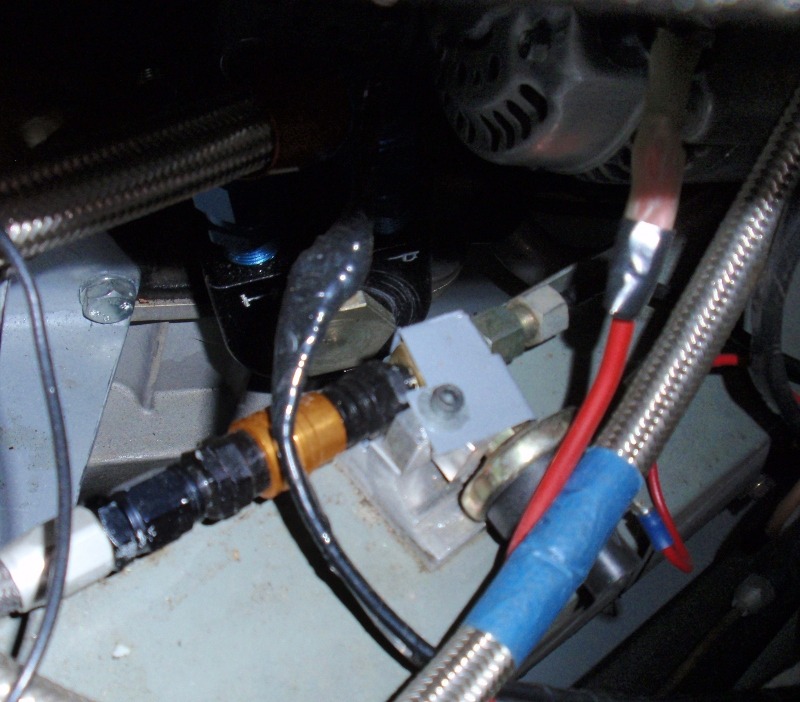
The engine block has the same pipe thread output as a TwinCam block. But I wanted both the standard Europa oil pressure guage and an idiot light. So I routed a line from the block through jiffytite lines from PegasusAutoRacing.com to a dry-break coupler (see the brass color in the above picture). The coupler pushes onto a Tee on the chassis rail (on top of an aluminum block machined to fit the parts and under the blue/grey hold-down). That is the bottom of the alternator in the upper right of the picture.
The Ford engine has nice flat areas to bolt the intake and exhaust. Ford sells really nice studs and screws to bolt those things on. A few useful Ford part numbers are:
These seem very well made. They come in bags of 4 to 6 each. The stud/nut combo is great where it fits, and where the stud would stick out too much or be hard to reach the screws (I would call them bolts) are great and have large head extensions so there is no need for a washer (which is normal, modern assembly practices would not use a separate washer unless there was somehow no choice). The nuts seem to be copper coated and are self-locking. The studs have Torx E7 ends so they are very easy to place and remove. The plastic spacers are to help place the exhaust 'centered', as the plate holes (especially the end ones) have lots of slop. You could do without the spacers, they just space the bolt from the 'plate' hole and are not much of anything. But they do get the exhaust plate centered nearly perfectly on the head. So I made a couple of aluminum spacers to replace the plastic ones, the aluminum should last (it can get lost but it won't melt!). Naturally they are shorter than the thickness of the plate so they won't interfere with anything.
Originally I was using a multilayer exhaust gasket from Caterham (I had no part number or source info) and when I redid the exhaust in June 2013 I needed a new gasket. Stock Ford gaskets were very thin and did not match up well to the exhaust plate/head interface. The bumped-out portion of the gasket was unsupported in part in the exhaust port --- ugh. I found (on the internet) that FCRC Machine had something called the Remflex Exhaust Gasket part number REM-52-001. It seems to work. And it's made nearby in Stockton, California!
More part numbers are on the part number page
The exhaust needed a 'plate' to build from. I supplied a Ford manifold for SVT Zetec, Ford P/N 2M5Z-9430-AA to the exhaust builder, but buying that whole thing and throwing all but the plate into the trash is an expensive way to go...
Nowadays finding an exhaust plate for Zetec is not difficult and one can always to go to dunnellengines.com to find one.
I also got a Ford exhaust gasket part number 968Z-9448-AA at the same time as the manifold, but have not used this yet and probably never will.
If you are going to disassemble/reassemble the engine a Ford manual is essential. For the head I suggest ARP Zetec 2.0L studs (not factory bolts). For the rods, I suggest ARP Zetec 2.0Lr rod bolts. The ARP parts come with specific ARP instructions.
The big-end bolts (and factory head bolts, if you use them) have a different approach than torque: Tighten to a modest torque and then tighten so many degrees. They mean degrees of the head of the bolt, not degrees of your (flexible) torque wrench! At a local tool store (K119 tools) I got a 'torque angle meter' part number LI-28100 (right now I forget the manufacturer, it's a major auto parts tool company with red/white packaging). A simple tool lets you do this job right.

This work is licensed under a
Creative Commons Attribution 4.0 International License.