| HOME | Software | Lotus Cars | DWARF | Kindle | Solar |
If you are serious about your TwinCam oil system, go to Omnitech-engineering.com as John McCoy has a TwinCam wet sump and a new oil pump that, together, will solve your oiling problems better than you ever imagined possible. See the link there to the Lotus ReMarque 2010 oil pump article.
Various designs exist to partially solve the Lotus Twin Cam oil starvation on right hand turns. Your favorite Lotus-parts supplier probably has a favorite and you should probably buy their design... But I wanted to do my own and have no moving parts in it.
On the other hand, this *is* only a partial solution, a long enough right hand turn with high cornering force will leave you with no oil pressure even with a baffled pan. The only *real* fixes seem to be a dry-sump system or one of the swinging oil pickups. So real racers will have to look elsewhere for the real solution, my 'solution' won't help.
My first source was the GGLC web site: http://www.gglotus.org/ggtech/tc-oilpan/baffledpan.htm is Don Nester's design. There are two problems with it: a) it has a moving baffle, and b) the drawing radically understates the size of the hole needed in the top cover.
I was not as thorough as Don in looking at alternate designs. I did, however, get advice from Rich Kamp http://www.kampena.com and based my design on some of his ideas as well as Don's ideas.
In late 1996 Rohan Hodges described a very different design on the LotusElan.net website. Using an early 120E pickup which curves over to the center of the pan and baffles, he has a centered pickup. No moving parts (other than two simple movable baffles). I think he was describing Col Croucher's approach.
In early 2008, on the Elan mailing list Col Croucher mentioned his ebook. He publishes a full specification with pictures of the right thing to do. Look at www.elantrikbits.com to get the idea and to find out how to buy the ebook. It's a wonderful ebook he sells, I bought it, but rather too late... It is the right thing to get. Ignore my rather nasty approach...
The design I came up with involves adding 22 guage sheet steel, 4 small bolts, and a bit of safety wire. First, the picture showing what the final thing looks like.
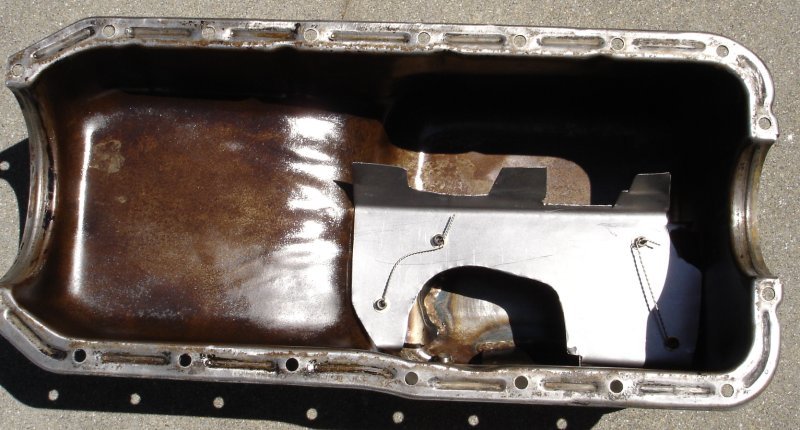
Here you see the safety-wired 10-24 allen head bolts and safety wire and the cut-out for the standard oil pickup. It's a very large cutout as the wire strainer basket on the standard pickup is quite large!
Without the oil pan modifications, if one put in 4 quarts of water and tilted the pan suddenly 45 degrees (as if 1+g right turn) the water left the area of the pickup in a tiny fraction of a second. Whoosh, gone. With the oil pan mods in place, with the same motion, the water stayed in place for 6 seconds at least, covering the pickup that long. Dramatically better. I hope it's enough. Clearly not as good as a moving pickup or a dry-sump though!
So lets slice the safety wire and remove the bolts and take off
the cover.
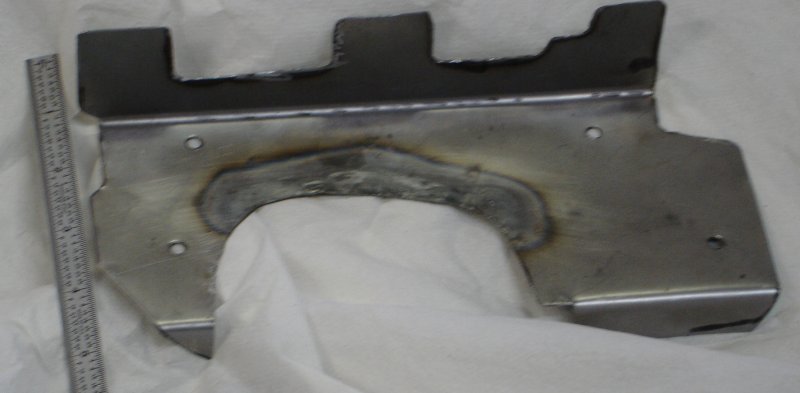 The cover plate is simply a simple thing, cut and folded.
The four bolt holes one does last (see below).
The cover plate is simply a simple thing, cut and folded.
The four bolt holes one does last (see below).
Here are the insides of the Elan oil pan.
Notice that the original factory baffle is still there.
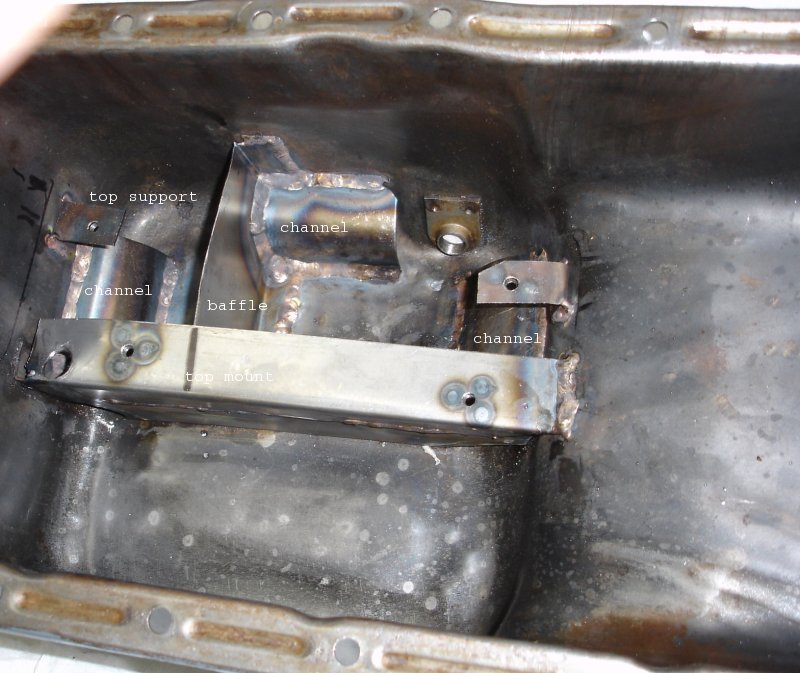 The "top support" is one of the 4 places the top bolts on. A simple
L of steel welded on with a nut welded on the bottom.
The "top mount" is a rectangular sheet folded 90 degrees
with 2 nuts welded on.
The "baffle" is a new piece of steel to prevent the oil moving forward under
braking.
The three locations marked "channel" are simply steel rectangles
bent into a semicircle.the oil mostly flows only one direction
thru these, since when it starts to flow the 'wrong' way
as soon as the level gets to the 'entrance' there is no way more
can flow out. Whereas for the 'right' way there is no restriction.
Note well there is one large mistake here. The "channel" at the
right of the picture is a mistake. Lets move to the next picture.
The "top support" is one of the 4 places the top bolts on. A simple
L of steel welded on with a nut welded on the bottom.
The "top mount" is a rectangular sheet folded 90 degrees
with 2 nuts welded on.
The "baffle" is a new piece of steel to prevent the oil moving forward under
braking.
The three locations marked "channel" are simply steel rectangles
bent into a semicircle.the oil mostly flows only one direction
thru these, since when it starts to flow the 'wrong' way
as soon as the level gets to the 'entrance' there is no way more
can flow out. Whereas for the 'right' way there is no restriction.
Note well there is one large mistake here. The "channel" at the
right of the picture is a mistake. Lets move to the next picture.
The Europa picture is much the same, but with one crucial difference.
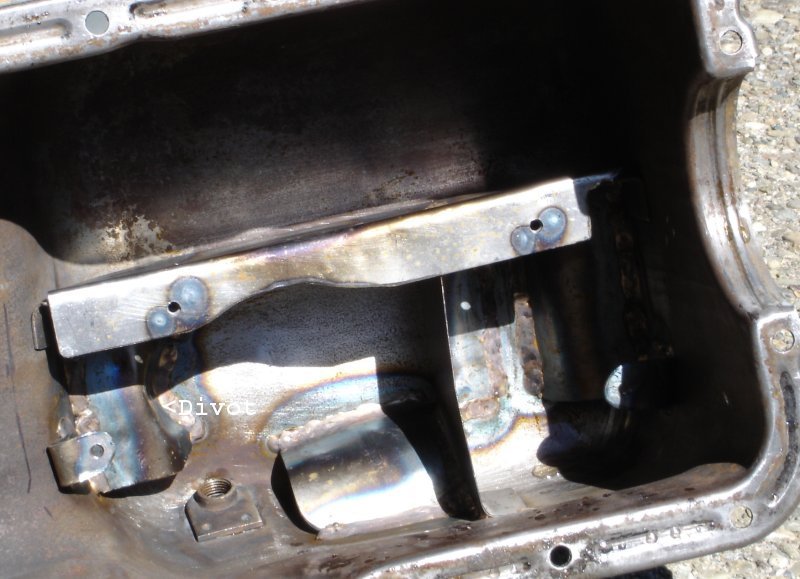 The "Divot Here" note is where the simple bent rectangle needed
modification. Bending it in is necessary so the oil pickup wire
cage can get all the way to the bottom of the oil pan.
One of these days I'll have to remove the Elan engine again,
and when I do I'll fix that front channel to have the "Divot" too.
Failing to add the Divot was a bad mistake... Sigh.
The "Divot Here" note is where the simple bent rectangle needed
modification. Bending it in is necessary so the oil pickup wire
cage can get all the way to the bottom of the oil pan.
One of these days I'll have to remove the Elan engine again,
and when I do I'll fix that front channel to have the "Divot" too.
Failing to add the Divot was a bad mistake... Sigh.
Note that these last pictures are the clue how to get the top part correct and with holes in the right place: screw bolts thru the nuts from the bottom, place the (undrilled) top part on it and scrape or tap above each bolt to make a mark for drilling. Remove and drill. And don't forget to make room near the front for the dipstick! You may find the dipstick hits the front channel and therefore has to be shortened a bit.
The screws and nuts don't have to be tightened excessively. drill holes for safety wire in the heads and bolt together firmly so no rattles can happen. Then safety wire. This way one can later remove the top piece to better clean the pan if needed.
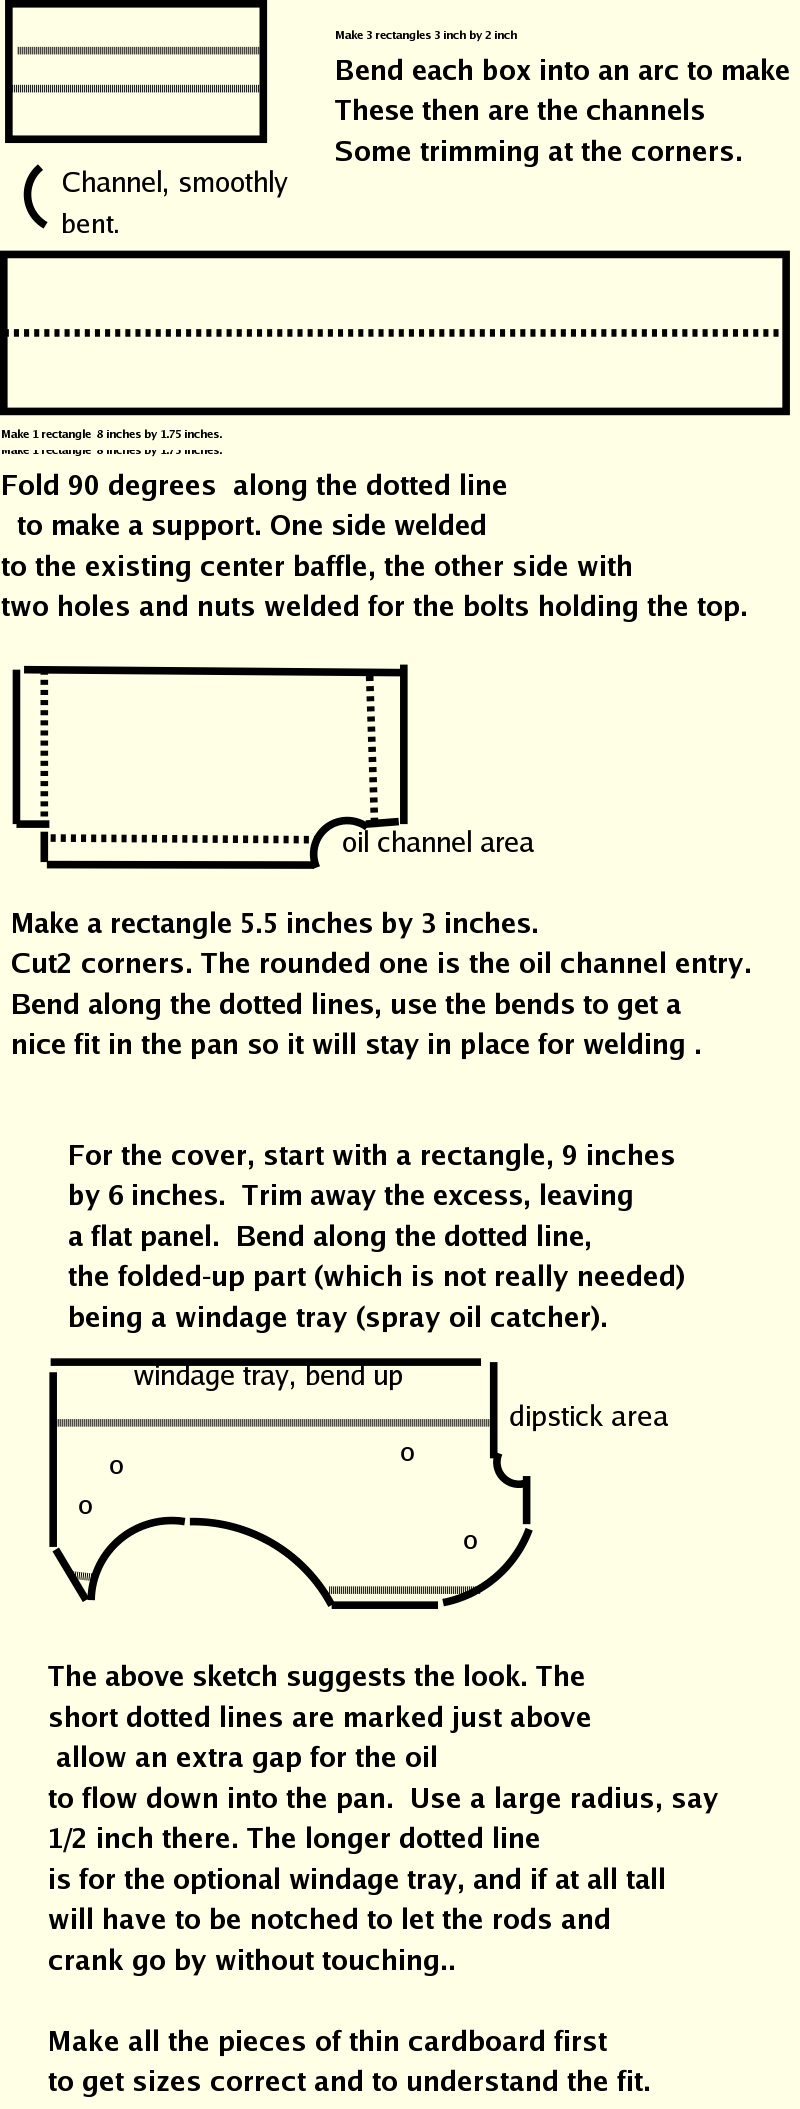
In an effort to be more specific, what follows is a diagram with the individual parts sketched. As it says below the idea is to first make the parts of thin cardboard or thick paper to get exact sizes. Of the 3 channels, it is also crucial to look at the "Divot" that one oil channel has to have in it for the oil pickup wire basket (see the description above). Sorry, but I'm too lazy to make a better diagram... Hope this is of interest.

This work is licensed under a
Creative Commons Attribution 4.0 International License.