| HOME | Software | Lotus Cars | DWARF | Kindle | Solar |
| [Elan On Track] |
| [Elan History] |
| [Configuration] |
| [Tools] |
| [Heater Valve] |
| [Alternator] |
| [Distributor] |
| [Stromberg Carb Adjustment] |
| [Headlights] |
| [Speedometer Angle Drive] |
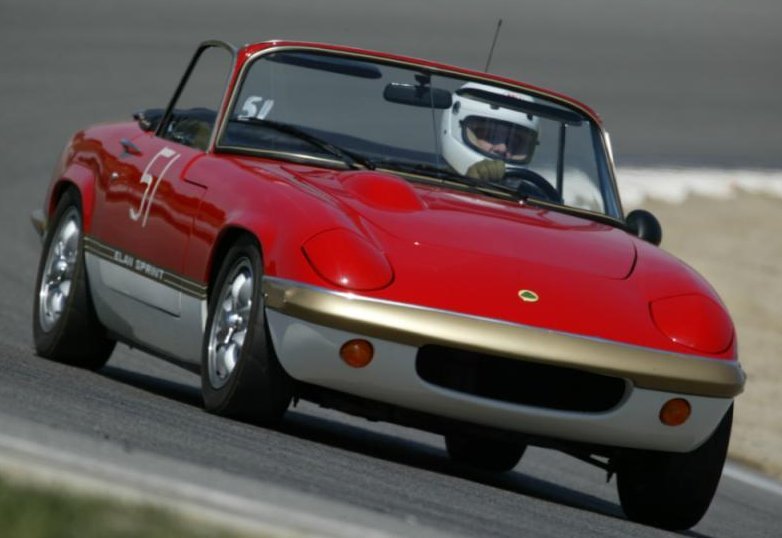
GGLC Track day, Laguna Seca April 9, 2003
Elans were built from 1962 thru 1973. Approximately 8500 cars were built in total.
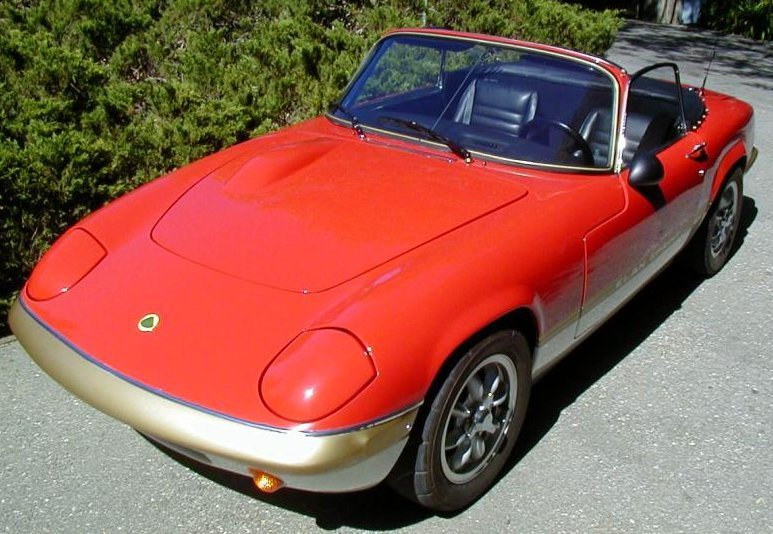
This 1966 Elan was rebuilt with all new parts in 1990 by a West Coast expert in classic Lotus: Rich Kamp. By all new, I mean even the body and frame were sourced new from Lotus. Only the engine and transmission were used and even those had most parts replaced (down to the bolts). It's effectively an Elan Sprint (a very late Elan) as built. Springs and shocks uprated a bit from Sprint standard in the mid 90's and replaced again after 2010.
Two such cars (identical aside from color) were built by Rich Kamp (Kampena Motors, as of 2018 in Sonoma, California) for a doctor who lived on the east coast. As a result, this is known as the "Doctor's Car". One car now lives near Carmel California, and the other went to Stinson Beach CA for 10 years. I purchased it from the Stinson Beach owner in October 2002. Perhaps I should say it "is temporarily in my care". My intent is to keep it in as like-new and perfect condition as I can.
At the 2002 West Coast Lotus Meet the Elan was faster than any Esprit at the Autocross, and some were very powerful much modified new Esprits :-) And the two cars Kamp built for the doctor were together for the first time since the early 90's, albeit for just a day or so.
In 2011 at LOG31 I bought Brian Buckland's book "The Rebuilding of a Lotus Elan". It's got many things Elan owners need to know that are published nowhere else. It's on high quality paper and quality printing in a 3 ringbinder. Highly recommended.
I have been using it for track days though now it's mostly retired to street use, the Europa is for track days.
It's got a roll-bar now for safety (required for track days at most tracks: Laguna Seca being the exception) and here is a picture with the bar, taken September 13, 2005 at Thunderhill Raceway Park, Willows California:
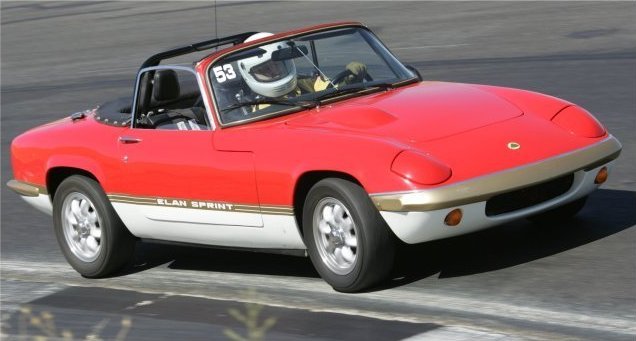
Photo copyright Dito Milian at GotBlueMilk.com.
The tires were Yokohama A032R 175/60x13 at purchase. The tires result in the odometer/speedo reading too high: at 70MPH the speedometer reads nearly 80 (the engine is just a little below 4000 rpm at that speed) (it could simply be a maladjustment of the speedo, my 3.55 diff matches the black speedo drive gear in the transmission). Though quite soft the tires last a long time on the street. Each track day removes about 1/2 millimeter tread depth from the rears (less from the fronts). In March 2008 the A032's were getting old, so I got the same size in a Yokohama A048. In October 2010 the A048's were howling, so I replaced them with Bridgestone 165/65R13 tires (after spending weeks figuring out where the howling was coming from to little avail, though replacing all(!) the wheel bearings was probably a good thing overall). The Bridgestones are ok, but if the tire pressure gets over 24psi at the rear it oversteers radically in hard cornering. I'm thinking I will replace the Bridgestones in 2012, they seem slippery on an autocross course, though it could just be the full tread depth leading to tread squirm. The Bridgestones stayed on till, in 2017 I had Kraus Racing put on a set of Avon CR6ZZ in the 175/70 size. These are designed to look classic in size and tread pattern but have modern sticky rubber. The Avons seem to work well: I used them in five GGLC autocrosses in 2017.
The Stinson Beach owner replaced the original steel wheels with 6 inch wide Panasports (as pictured above) and the Panasports are very nice indeed. The 4.5 inch wide steel wheels supposedly bent very easily and are better forgotten (unless you are really intent on originality, of course).
Being in Sprint configuration, the radiator was the S4 radiator, the smallest one. I finally got tired of having to turn the heater on to keep the engine cool on warm (not even hot) days. So in May 2006 I installed a Griffin 26R style radiator and filler-box from Dave Bean. All dimensions are in inches.
| fins-width | fins-height | sq.in. | cubic.in. | |
|---|---|---|---|---|
| 9.5 | 15 | 142 | 285 | original |
| 12 | 18 | 216 | 648 | 26R-style |
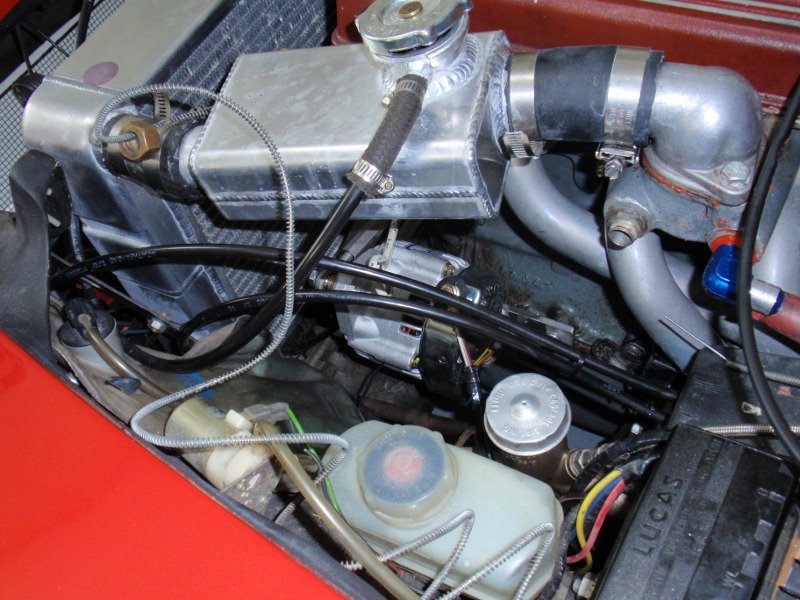
Now with the (aftermarket, but period correct) plastic fan on the water pump at idle in the garage I cannot even get the temperature high enough to start the electric fan... Plus the 26R style filler is now the highest thing in the system (unlike the old style) and as a result getting the air out of the system is much easier. The old and new radiator pictures are at different angles, I hope it's not too irritating that way. [The old one has no 'Otter' switch, I removed that a while ago and had a small plate put in its place. It nearly fell out in the middle of nowhere and that was a problem I could not live with!] The new radiator has a modern switch that screws in, you can see the white wire at the top right of the radiator (the wire is not British color coded, but has its function printed on the wire every 4 inches).
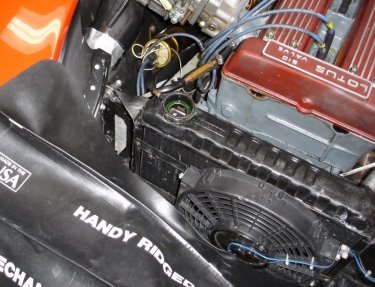
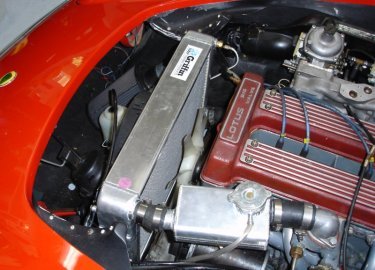
The new radiator has 4 fixing bolt locations welded to the front and for the lower two I created brackets that hold the bottom in place (bolted to fiberglass fender wells and radiator). 22 guage steel brackets I made hold the electric fan in place (using all 4 fixing bolt locations). I've added a relay. The temperature switch is just a switch and the relay provides power to the electrical fan. Similarly (in parallel) there is a manual switch by the drivers left knee (up out of sight) that turns on the radiator fan manually if desired, but it's really not needed now.
Here is the Elan engine ready to go back in the car after a
rebuild.
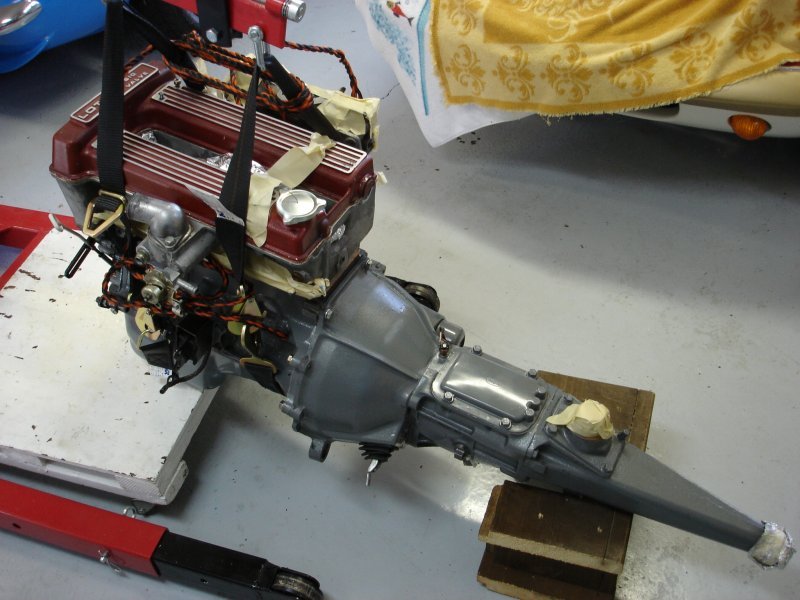
There is just barely enough space. The headers just barely go on with a bit of squeezing things, and only when the engine is half-in half-out of of the engine compartment. By comparison, removing/replacing a Europa engine is a piece of cake, there is so much empty space around the Europa engine. That's the 3-rail 4speed gearbox (with new bearings) and the 3 piece case is quite heavy. Bell Housing 16 lbs; Case 13 lbs; tail Housing 12 lbs and that is without gears, bolts, bearings, or anything. Bare case weights. The weights were taken with cheap bathroom scales, so are only approximate.
I was running points and generator from 2004, but in 2009 replaced yet another failing set of points but with a Pertronix II. As of May 2010 I am replacing the failing generator with an alternator from JAE. The starter was giving trouble when I got the car, so I got the Tilton geared starter from Dave Bean (it has its own starting relay built in). Trouble free, it spins the motor very well indeed. On a run on a hot day the original Elan starter relay (which is still in the circuit) gets too hot to work after the car is parked for a while (if the bonnet left closed). Even so I leave the relay in place and in use so it 'looks right'.
The original battery was hard to keep in place on track days (it was fine on the street). I replaced it with a tiny Odyssey PC 680 battery and it has served very well indeed and saves more than 10 pounds. I added a shutoff near the battery in the trunk.
The headers are coated by JetHot and the aluminized color looks absolutely great. So far (May 2010) they look close to the same as they came back from JetHot (the coating not as bright silver, but still nice), even after years of use. Highly recommended (no financial association, just a satisfied customer).
The car was missing the exhaust support at the tail of the transmission, and Brian Buckland's book showed what the factory support looked like, so I made a support that looks (pretty much) like the original and that has really helped keep the exhaust up. On local bumpy roads the exhaust no longer rings (was hitting the bump tops). It is probably true that the aftermarket headers downpipe is just a little bit too long, helping push the exhaust close to the road. But that does keep the heat a little further from the clutch slave cylinder!
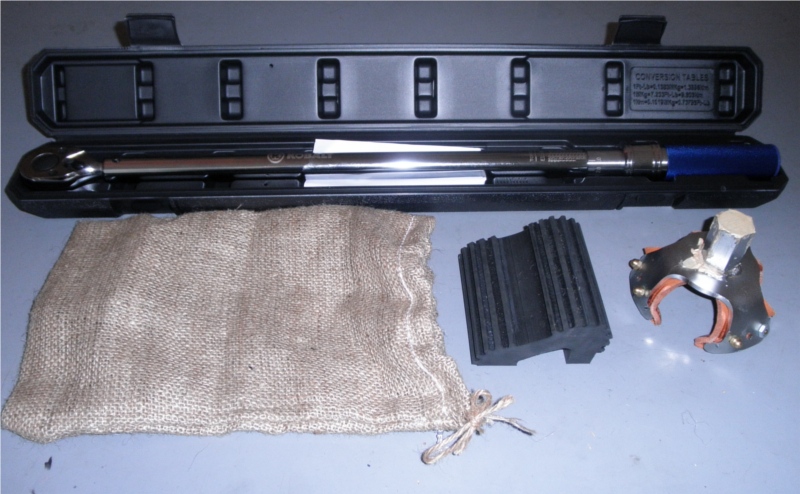
When you have knock-off wheels you need a way to remove and replace them. With Panasports the alloy spokes are very close indeed to the knockoffs. Hitting the ears of the knockoffs (as done by a mere mortal) without damaging the wheels would clearly be impossible. So I've assembled a set of tools for this task.
At the right is the traditional English "Thor" brass-faced hammer. But never used directly on the knockoff! Instead, a piece of wood is required. Ordinary 2x4 will simply splinter, one must use tough (ie, expensive) hardwood. A piece 6 to 8 inches long gives enough standoff so one can give a good blow and not come close to the wheels or the car. Of course one has no idea now tight one has made the wheel! The hardwood will eventually splinter, but it's easy to carry around.
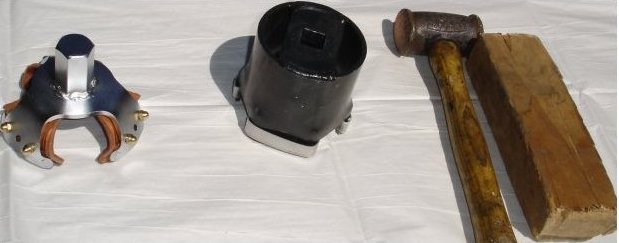
At center is the second tool I've tried. It has a 1 inch square drive. I added the aluminum strips to try to prevent the hard steel damaging the knockoffs. Others have said they add leather or rubber instead. The little tiny tabs on the inside edge (obscured by the strips) that hold the tool to the knockoff ears extend just 0.1 inches -- and after using the tool perhaps 40 times a couple of them are bent. The little tabs do directly touch the (back of the) knockoff ears. Left to itself this tool falls to the floor with a large clang. It weighs over 2 pounds.
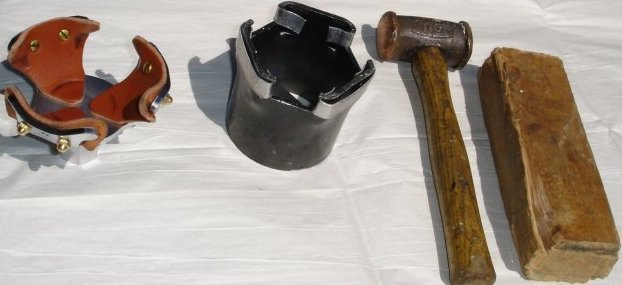
At the left (and see below) is a tool made by Sarto Rocheleau ( knockoffwrench -at- yahoo =dot= com), a GGLC member. It holds itself on the wheel and the astonishingly sturdy leather prevents any damage to the knockoff itself. The metal bits never touch the wheel or the knockoff. It's very strong and has none of the defects of the second tool. The hex center fits a standard 1 inch socket. The tool weighs 1 pound. Sarto was at the 2006 West Coast Lotus Meet in Morro Bay, California and that's how I came to try this tool. If your Elan has knockoffs, you really do want this tool...
UPDATE 2012: Sarto now has a 24 inch 50-250 pound Kobalt torque wrench (6 inches longer than most torque wrenches) and a rubber wheel-stop so one can lean on the wrench without sliding the tire on the floor. The cute little bag lets you keep the tools in the Elan trunk in a tradtional way! (He also has a nice socket for the torque wrench, but I use my own socket, so no socket shown here). Very nice kit.
The heater valve began leaking because the motor mounts had sagged, letting the valve touch the body. Oops. On disassembly I discovered the threads were quite bad. Screwing the original heater valve back in lead to a poor seal. I suspect someone used a 3/8 inch US pipe thread piece in there at some point. At any rate it leaked sightly and I could not understand how to get the original valve to work and remain leak-free.
So I installed a revised non-standard heater valve. What follows is the installed valve.
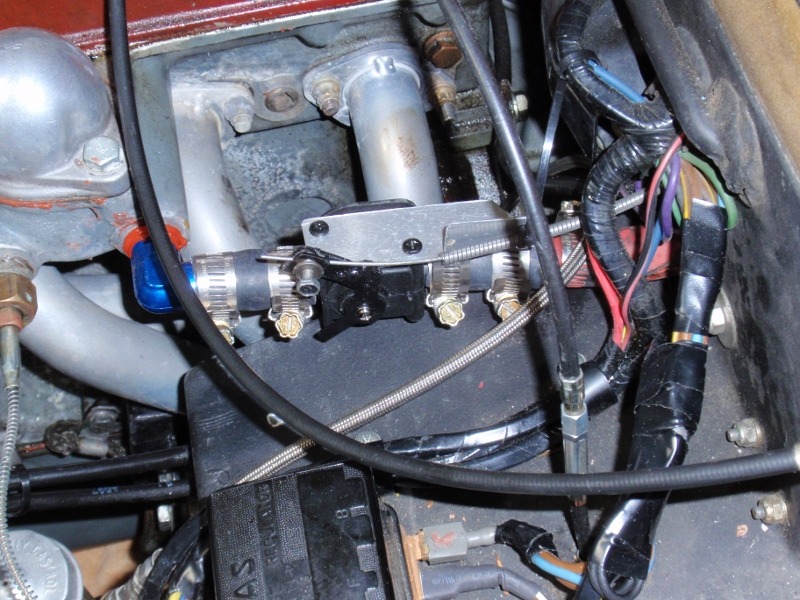
That's not easily understood. so below I show the pieces with no heater hose.
I sort of messed up the picture below, the adapter (which I machined from a 5/8 inch solid 6061 aluminum rod) is reversed. The blue piece is a PegasusAutoRacing.com 90 degree elbow in aluminum (part number 3253-06-08) with the AN 8 threads machined off to a 5/8 inch diameter. The elbow is screwed into the head firmly. The Elan heater hose is 1/2 inch heater hose. The valve is a NAPA 660-1363 heater valve from a Ford LT truck. It is plastic with inlet/outlet for 5/8 inch hose.
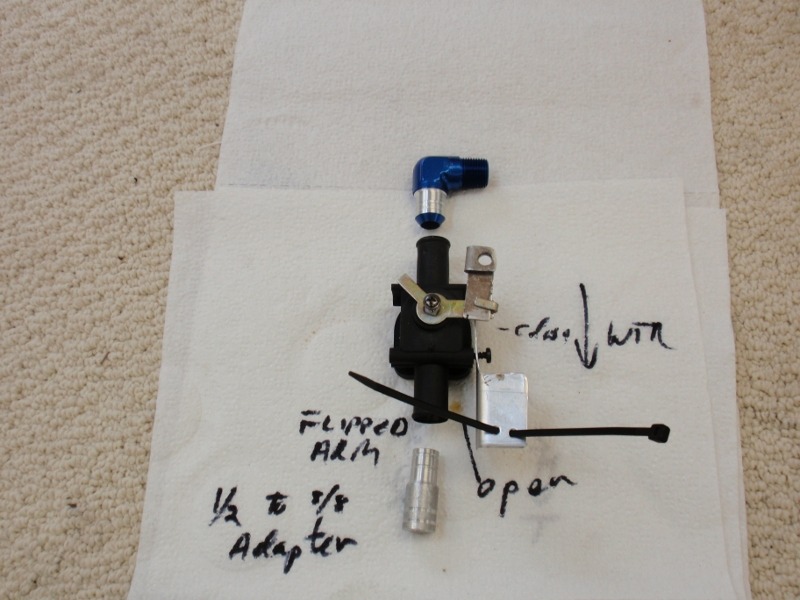
The side piece is aluminum bent and perforated to screw to the valve (screws are with the valve from NAPA) and to hold the end of the heater control wire. I did have to shorten the heater control wire and covering. I also had to turn the provided valve lever arm upside down and weld on a piece to hold the control wire. The nice thing is the pieces screw on so they are easy to remove and to replace.
The generator (dynamo) was beginning to squeal. Rather than try to find someone local to rebuild it I ordered an alternator kit from JAE. Getting the adjuster mechanism to fit took a bit of fettling, I had to add washers to get it all away from the alternator and the engine front cover. And there was some revising of the wiring between the alternator and the no-longer-really-used regulator.
I removed the stock points and installed the Pertronix II as shown here. The stock points rub bar wore down way too fast, making the dwell and the advance move too much (requiring too much maintenance).
In September 2012 I took the distributor to Keith Franck who machined the distributor case slightly to accept a roller bearing inside the distributor. The original plastic bearing (if one dare call it that) wears and the resulting up and down motion (loseness) of the distributor shaft caused sigificant scatter in the firing point of the spark plugs. The cause of the wear is the downward pull of the distributor shaft caused by the machined twist of the gears on the jackshaft in the block pulling down on the distributor shaft. The new parts include a machined piece that ensures a precise fit and the roller bearing ensures that wear will no longer be a factor.
Keith's store is on webstore.com, he is DCOE_Tuner there. It seems impossible to find DCOE_Tuner via a webstore search (webstore needs to improve their site, I think), so it is best to use the link. Some machining on the distributor is required so it is best to let the expert install the bearing. I can do my own machining but I am glad I had Keith do it, he's done many of these and his equipment is first rate. And Keith checks a number of other problem areas in the distributor so one won't get surprised later.
Since I had the Strombergs rebuilt by Joe Curto (in New York) (rebuild took a while but they came back like new) I thought it was time to work on getting them adjusted.
I installed a wide-band oxygen sensor bung in the 2-into-1 of the headers and attached an Innovate LM-1 and an inductive pickup (to get rpm into the log). As of December 2010 there is no throttle position sensor.
The log from the LM-1 which begins with idle and involves 30mph then 45 mph driving and some freeway driving at 70 mph and a full throttle acceleration in 2nd and 3rd gear up a small hill is 2010-12-11-b2arfullthrottle.log. It's really only easily usable with the Innovate log-reading software (proprietary Windows only software, though Wine on Linux runs it very well). The needles are B2AR. The jets (center) are set 0.125 inches down from the bridge. The needle holder bottoms are even with the bottom of the carb piston (2.5 turns from full up on the adjuster). A/F is 12.4-13.5/1 wide-open-throttle acceleration 3000-5000rpm. At idle (1000 rpm) the A/F is 10 to 12/1 (too rich).
The next log from the LM-1 which begins with idle and involves 30mph then 45 mph driving (up thru 1:45) and some freeway driving at 70 mph and a full throttle acceleration in 2nd and 4th gear up a small hill is 2011-1-27-b1y-jetat092-2chan.log. Here the Stromberg jets have been moved up to 0.092 inches below the bridge. And the needle is a B1Y. Idle is 11/1, cruise at 45MPG is 12-14/1, Freeway cruise is 13-14.6/1 and WOTuphill is 12.5-13.6/1.
2011-02-01: Did back to back test runs, first with b1Y then with B2AR. The idle (in the logs) is too fast once things warm up.
In the first two tests the needles were adjusted to just even with the bottom of the piston (which is almost exactly 2.5 turns from fully up). In Dyno runs a few years ago with B2AR (but before the carb rebuild) we discovered that needle location was too lean for maximum power at WOT. Which is data that is supported by the B2AR WOT runs. Of course adjusting for WOT is going to mean too rich at idle and on the highway....
B1Y (session 2)
B2AR
B2AR 1/2 turn of needle -- richer
This is pointlessly rich in cruise, but is better for track use/repeated WOT.
The B2AR needles behave oddly at WOT. The mixture strength declines as the revs go up(to 6000 in 3rd, and again in 4th to 4500rpm). Whereas the B1Ys retain a constant-ish mixture strength.
The acceleration felt better with the B2ARs, I do not know if that was the car or the driver, but it felt like there was a bit more acceleration, the engine was a bit more responsive.
There are some rpm bobbles in the acceleration, the freeway ramp is upward (nice) but has semi-filled potholes about half way up which cause some excitement (wheel bounce).
The log files are fairly simple text files but not something one can work with in a spreadsheet without some massaging, and I have not yet written code to massage the data into spreadsheet-friendly form. Basically there are 3 data tracks: Time in seconds, AF ratio, and rpm.
The logs:
2011-02-01-b1y.log b1y
2011-02-01-b2ar.log b2ar
2011-02-01-b2ar-0-5rich.log b2ar up 1/2 turn
I changed the mechanism that raises/lowers the headlights. Now it uses a linear motor with a 4 inch stroke. Turn on the headlights and the lights rise up. Turn off the headlights and the lights rotate into the fender...and stay there.
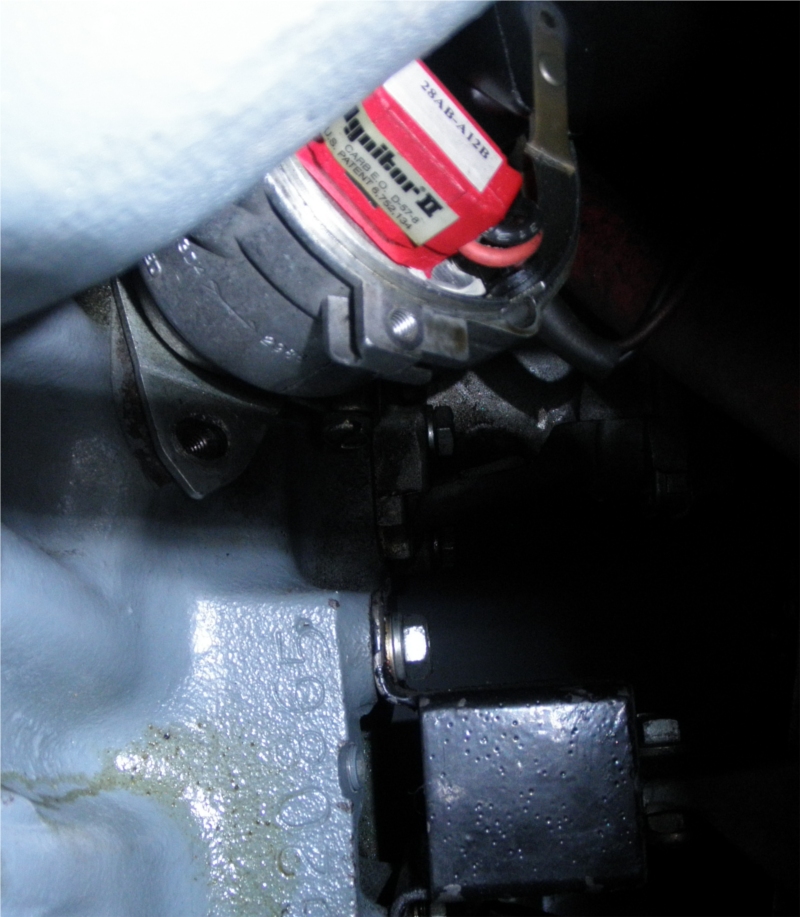
The speedometer angle drive has dripped oil from the transmission for a long time. About a tablespoon a week. Keith Franck explained how to fix this by adding a rubber seal and an o-ring. I made changes on May 10 2018. so here are a couple pictures.
The screw at the upper left seals a hole meant to allow greasing the gear inside the angle drive. Unscrew it. Using some good quality grease use a finger to push in some grease. Repeat a few times. Then put the screw back in and tighten.
The rubber seal is something I cut from a 6x6 inch piece of 1/32 inch thick Buna-N rubber sheet. McMaster.com part number 80115K111. The sheet has some fabric in addition to the rubber so it won't squeeze out.
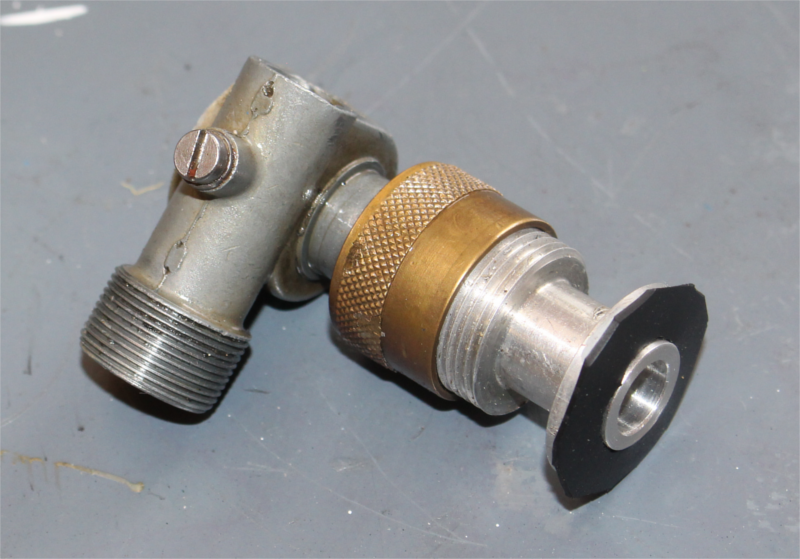
Next, a picture of the aluminum part (which I will call the extender) after a recess machined into it (in the picture the o-ring rests next to the recess).
Apparently there was some paper filter piece for that spot (applicable before the machining), but if this Elan ever had that I never noticed.
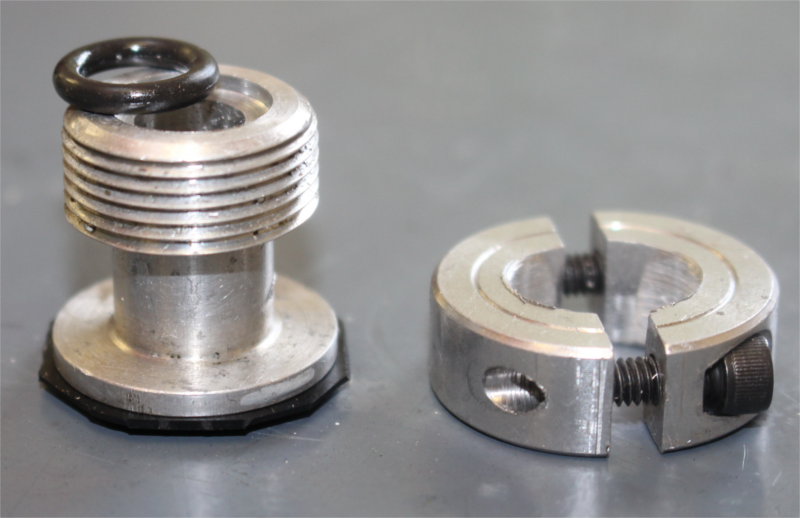
The chosen Viton o-ring (Buna-N would have been fine too) has an OD of 0.56 inches, an ID of 0.36 inches, and the thickness is a bit over 0.1 inches. In the end I machined that recess at about 0.075 inches deep and with a diameter of about 0.54 inches. Perhaps I should have made the recess 0.070 or so inches deep. None of the dimensions are critical though the recess needs to be deep enough and a sensible diameter to keep the o-ring in place.
Holding the extender in the lathe without breaking it seemed a challenge. I modified that 1/2 inch ID clamp (boring it out a little) and clamped it on and then adjusted the 4-jaw chuck so the extender ran true in the lathe within a few thousands of an inch. That all took over an hour. Actually machining the recess took little time and nothing broke. Whew!
The correct order of reassembly seems to be: A) attach the extender with oring and seal to the transmission with the Y lever clamp (not shown) holding it in place. B) Attach the angle-drive part to the speedometer cable. C) Finally insert the angle drive pin into the extender down into the transmission and screw the big nut onto the extender.
It's now May 19, 2018. Over the last few days there have been no oil drops from the transmission!

This work is licensed under a
Creative Commons Attribution 4.0 International License.